Style Guide <h1>
 This page serves as an example of the different heading, image, and list styles that can be used to organize your content on a page.
Using Headers Effectively <h2>
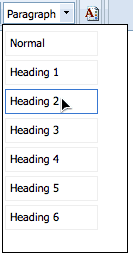
Dividing pages by using section headers helps to turn your content into easily digestible chucks. This page structure allows visitors to quickly scan a page for the information they are looking for. Heading styles can be applied by highlighting the text and selecting a heading style from the dropdown in the Formatted Text and Images editor.
Every page should include a page header or <h1> line at the top that represents what the page is about; the <h1> should also match the page title which is defined in the "display name" field of page properties. It is helpful to include a brief page summary after the page header. The rest of the page should follow a descending structure of <h2> through <h6>.
Link Styles <h3>
Links can be created by highlighting your text and clicking on the link icon in the editor. Your links will look like this.
Heading 4
In eu dui sit amet mauris mollis sollicitudin a a enim. Nam eget hendrerit est. Pellentesque porttitor est sodales sapien ornare nec porta dui semper. Nunc odio nunc, tempus eu aliquet nec, vehicula eu metus. Donec tincidunt pulvinar eleifend. Sed elementum metus eu eros iaculis vel fringilla ligula commodo.
Heading 5
In eu dui sit amet mauris mollis sollicitudin a a enim. Nam eget hendrerit est. Pellentesque porttitor est sodales sapien ornare nec porta dui semper. Nunc odio nunc, tempus eu aliquet nec, vehicula eu metus. Donec tincidunt pulvinar eleifend. Sed elementum metus eu eros iaculis vel fringilla ligula commodo.
Heading 6
In eu dui sit amet mauris mollis sollicitudin a a enim. Nam eget hendrerit est. Pellentesque porttitor est sodales sapien ornare nec porta dui semper. Nunc odio nunc, tempus eu aliquet nec, vehicula eu metus. Donec tincidunt pulvinar eleifend. Sed elementum metus eu eros iaculis vel fringilla ligula commodo.
Images Styles
There are several CSS classes that can be applied to images to help format your pages.
Image Left
 In this example the image has a class of imageLeft. This will float the image to the left allowing the text to wrap to the right. The image should be placed in the text where you would like the top of the image to line up with vertically.
Image Right
 In this example the image has a class of imageRight. This will float the image to the right allowing the text to wrap to the left. The image should be placed in the text where you would like the top of the image to line up with vertically.
List Styles
Unordered Lists
Unordered lists are simply bulleted lists. All styles for bulleted list have been set using the CSS. You may use the HTML editor's bulleted list button (like Word) to create bulleted lists. Hit return once to create a new bulleted item and hit return twice to close the bulleted list and create a new paragraph below the list. You may insert a bulleted list inside of another list to create a secondary level and outline effect. All spacing has been defined using the CSS, so no other styling are spacing should be applied manually.
List Title <h4>
- Sample list item one
- Sample list item two that is longer than the first
- Second level unordered list
- Multiple unordered lists can be nested using the WYSIWYG editor
- Styles defaults are setup for two levels of unordered lists
- Good style recommends having at least three bullets per list
- But you can have more
Ordered Lists
Ordered lists are numbered bulleted lists. All styles for the ordered list have been set using the CSS. You may use the HTML editor's numbered list button (like Word) to create an ordered list. Hit return once to create a new numbered item and hit return twice to close the list and create a new paragraph below the list. Ordered lists default to Numerals for the first level and lowercase alphabet for second level. Ordered lists are useful for creating directions. All spacing has been defined using the CSS, so no other styling are spacing should be applied manually.
List Title <h4>
- Sample list item one
- Sample list item two that is longer than the first
- Second level ordered list
- Multiple ordered lists can be nested using the WYSIWYG editor
- Styles defaults are setup for two levels of ordered lists
- Good style recommends having at least three bullets per list
- But you can have more